Kristy Morrison with comment #5!! I used Random.org's random number generator to pick a winner so that it would be, well, random :)
Congrats Kristy! Message me your mailing address and I'll get the gift card in the mail tomorrow!!
Much love to all who entered! There will most certainly be more giveaways in the future, so make sure to enter again.

Tuesday, July 31, 2012
A Milestone....and a GIVEAWAY!
Alright folks, today Confections from the Cody Kitchen hits 100,000 views. This is of course a bit exciting in and of itself, but the part of it that excites me most is that 47,000 of those 100,000 views have come in the last 5 weeks. A bit nutty when you think about that knowing that my blog was started way back in February 2011. I definitely remember days when I was doing good to get 18 views. No joke.
I've worked really hard over the past few months to step up my game and hopefully you all have been able to tell a difference. I got serious about being more consistent with my posts, and probably the biggest difference can be seen in my photos. Now I spend much more time setting up a shot and then editing it. The photos from even just a few months ago are downright scary!
Lord knows I have SO far to go though. When I see other powerhouse blogs out there getting 400K+ views a month it makes my measly view count look, well, measly.
But the whole point of this is to say thank you. Thank you from the bottom of my heart. This blog started out as a fun way for me to share my endeavors in the kitchen and has turned into so much more. As a lot of you have read, my relationship with food hasn't always been healthy, but this blog has brought me further than I could ever have imagined on that journey.
* If you haven't read my story, I would encourage you to do so. I think it will give my posts a slightly different meaning. Here are the links to Part One, Part Two and Part Three.
Thank you for reading. Thank you for hanging in there when I miss a post. Thank you for your encouraging comments. And thank you for making me feel so incredibly welcome here in the blogosphere. It warms my heart and makes me excited to hit the "publish" button each morning.
And of course this milestone means a giveaway! What fun would it be if there weren't something FREE?? Up for grabs is a wonderful $35.00 gift card to one of my favorite stores, Bed Bath and Beyond. BBB is one of my go-to's for cooking and baking supplies and I'm sure you won't have a problem finding something there either.
To enter you need to do 2 things:
1. Become a fan on Facebook OR follow us on Twitter. Or both if you're eager beaver :)
2. Leave a comment below stating what you would buy with the gift card were you to win it.
You must complete the entry requirements by tonight Tuesday, July 31 at 10PM Eastern Standard Time. The winner will be announced at that time via random draw.
Only one entry per person.
Only one entry per person.
Good luck!
Monday, July 30, 2012
Gluten Free Breakfast Cookies
You're thinking one of two things: No way do I want to start my day off with a sugary sweet! ....or..... Cookies for breakfast? Heck yes!
The good news is that these gluten free breakfast cookies will please you no matter your viewpoint. These cookies have barely enough sweetness to put them into the "cookie" category, but the sweetness comes from wholesome sources such as bananas, shredded coconut, honey and cranberries that will keep your tummy happy until lunch rolls around.
I, myself am not one to crave loads of sugar in the morning (don't worry, that definitely comes a few hours later right after lunch and lasts until, oh I don't know...bedtime?). If I eat something sugary first thing in the morning that's all I'll crave the rest of the day. Not sure why, but it happens every time like clockwork.....I eat a cinnamon roll for breakfast and by 10:30AM I'm dreaming of chocolate.
But these cookies fit the bill when it comes to my idea of a perfect breakfast. Good quality natural ingredients that are both tasty and filling (due to the protein and fiber content) are what separates these cookies from those that you are likely to find at the grocery store: cookies with 20+ ingredients, many of which you have no hope of being able to recognize much less pronounce.

The version below is gluten free, but if you wanted to add whole wheat flour in place of flaxmeal you certainly could. Just know that it negates the gluten free factor.
Along those same lines, you could also switch up a lot of the ingredients below......olive oil for coconut oil, raisins or dried blueberries for cranberries, pecans for almonds.....you name it, it could probably be done and turn out just as tasty.

The good news is that these gluten free breakfast cookies will please you no matter your viewpoint. These cookies have barely enough sweetness to put them into the "cookie" category, but the sweetness comes from wholesome sources such as bananas, shredded coconut, honey and cranberries that will keep your tummy happy until lunch rolls around.
I, myself am not one to crave loads of sugar in the morning (don't worry, that definitely comes a few hours later right after lunch and lasts until, oh I don't know...bedtime?). If I eat something sugary first thing in the morning that's all I'll crave the rest of the day. Not sure why, but it happens every time like clockwork.....I eat a cinnamon roll for breakfast and by 10:30AM I'm dreaming of chocolate.
But these cookies fit the bill when it comes to my idea of a perfect breakfast. Good quality natural ingredients that are both tasty and filling (due to the protein and fiber content) are what separates these cookies from those that you are likely to find at the grocery store: cookies with 20+ ingredients, many of which you have no hope of being able to recognize much less pronounce.

Do you want one or all four in
that stack?
The version below is gluten free, but if you wanted to add whole wheat flour in place of flaxmeal you certainly could. Just know that it negates the gluten free factor.
Along those same lines, you could also switch up a lot of the ingredients below......olive oil for coconut oil, raisins or dried blueberries for cranberries, pecans for almonds.....you name it, it could probably be done and turn out just as tasty.

Friday, July 27, 2012
Oven Roasted Cabbage
When you think of a delicious and flavorful veggie side dish, what comes to mind? Probably sweet potato casserole, green beans, roasted zucchini, garlic mashed potatoes, etc. But what about cabbage? Yeah, I didn't think that one was very high up on your list.
I'm all about eating healthy, but when I see cabbage I usually think "rabbit food". That or I wonder what kind of slaw is fixing to be made. And I don't like slaw.
But this cabbage recipe just might change your mind. It's the easiest side dish you'll ever make. It takes next to no time to throw together and gives you a bit of time to prep other parts of your meal while it's roasting.
And since it's summer and there is plenty of fresh produce to be found, there's no excuse not to make this.
And since all you need is a head of cabbage, that means this dish can be prepared on the cheap.
And since you roast it on a pan lined with tin foil there is virtually no clean up.
Okay, there are four reasons right there to make this dish! Do you need more convincing? If so, hopefully these pics will do the trick :)

Those lightly browned parts are where the
flavor is.
Thursday, July 26, 2012
Zaxby's Style Sauce
At the beginning of this week I posted some yummy sweet potato chips. Along with those chips I made some Zaxby's style sauce that I served with the chips and on the burgers we ate that night.
I'm not sure how far the Zaxby's franchise stretches, but I'm guessing it isn't too far out of the southeast. Zaxby's is a chain restuarant known for it's chicken-centric menu and A-mazing sauce that diners generously douse their sandwiches, wings and fries with. There's still a lot of debate over what all goes into it (and in what quantities), and I'm pretty sure that even the best copy cat recipe still doesn't quite hit the nail on the head.
I did some digging and found the below recipe hailed as the best copycat around. While it didn't taste exactly like Zaxby's sauce, it was really good and therefore worthy of sharing.

Post-dinner that night curiosity got the best of me and I hopped back onto the computer for an online search for the exact list of ingredients in the sauce. I'm not sure why I didn't think of this before. Geez.
The Zaxby's website was gracious enough to list the ingredients as follows.....
Soybean oil, water, tomato paste, high fructose corn syrup (!!!!), corn syrup, distilled vinegar, salt, egg yolks, Worcestershire sauce concentrate (distilled vinegar, molasses, corn syrup, water, salt, caramel color, garlic powder, sugar, spices, tamarind, natural flavor, sulfiting agent), spice, sugar, garlic*, potassium sorbate (preservative), xanthan gum, calcium disodium EDTA to protect flavor, natural flavor. *Dehydrated.
Let me interject and ask: WHY is high fructose corn syrup in EVERYTHING?! I had expected that it was in there, but it's frustrating to see that it's very high up on the list and is therefore in the sauce in a pretty large amount. Sigh.
Despite my sauce not matching up to Zaxby's tit for tat, I still loved the outcome and didn't have any problem slathering my burger with it :) And hopefully you won't either.
Tuesday, July 24, 2012
Tuesday's Tips, Tricks and Tid-Bits ~ How to Identify a Bad Egg
You've got a bad egg there. No, literally. How often have you wondered whether or not the eggs you have on hand are fresh? You can't exactly smell them (unless they're rotten, that is), but luckily there are a few dead giveaways that you need to toss them ASAP.

First you need to.....
1. Fill a fairly deep bowl almost to the top with cool water.
2. Gently place an egg into the bowl, being careful not to break it. If the egg floats, it's a bad egg. If it sinks, proceed to step #3.
3. If the egg lays flat along the bottom of the bowl it is fresh. If it stands on one end, it's still fresh, but less so than if it laid flat. Both of these would be safe to eat, but you should eat the egg that stands on one end first.
4. If you're even the least bit hesitant about a carton of eggs, test each one just to be on the safe side.
Last one to do so is a rotten egg! Sorry, had to do it :)
Monday, July 23, 2012
Homemade Sweet Potato Chips
Last weekend the hubs and I opted to cookout at home versus heading out for dinner. Those nights are my absolute favorite. Don't get me wrong...I definitely enjoy eating out, especially at local restaurants, but there's just something about the smell of the grill and spending the afternoon chopping and dicing away to prep a delicious dinner that night.
Sweet potatoes were on special that particular Saturday, so we decided to try our hand at some homemade sweet potato chips. We received a deep fryer as a wedding gift that I have been DYING to use, and this proved to be the perfect opportunity.
I pulled out my vintage mandoline slicer that I had picked up a few weeks ago at an antique store and started slicing away. I wish I had been able to slice the chips more evenly, but for my first go at it I didn't think it was too shabby of a job. Plus, this thing is a few decades old so it probably wasn't all my fault, right?
*Make sure you have a mandoline slicer on hand for this task. It's practically impossibly to slice these thin enough with a knife.

I also whipped up a Zaxby's style sauce that we used for both the chips and the burgers. I'll post the sauce recipe on Wednesday, so make sure to check back!
Sweet potatoes were on special that particular Saturday, so we decided to try our hand at some homemade sweet potato chips. We received a deep fryer as a wedding gift that I have been DYING to use, and this proved to be the perfect opportunity.
I pulled out my vintage mandoline slicer that I had picked up a few weeks ago at an antique store and started slicing away. I wish I had been able to slice the chips more evenly, but for my first go at it I didn't think it was too shabby of a job. Plus, this thing is a few decades old so it probably wasn't all my fault, right?
*Make sure you have a mandoline slicer on hand for this task. It's practically impossibly to slice these thin enough with a knife.

These chips were so bright and vibrant in color...
loved them!
I also whipped up a Zaxby's style sauce that we used for both the chips and the burgers. I'll post the sauce recipe on Wednesday, so make sure to check back!
Friday, July 20, 2012
Mile High Biscuits
Every Friday growing up my dad would take me by Stoney's, home of the best biscuit in our tiny little town, for a bit fluffy one all wrapped up in tin foil to keep it warm until I got to school. I would always get mine plain with just a bit of butter. Not too much though. (For what it's worth, my taste has definitely changed and I now get one packed with bacon and egg.)
Is it crazy that the most distinct thing I remember about ordering those biscuits at the end of each week was that "desserts" was misspelled on Stoney's menu posted at the drive thru? It was spelled with only one "s". [Face-palm] Ugh.
I found these biscuits on (you guessed it) Pinterest. These are apparently the very famous biscuits from Ruth's Diner in Salt Lake City, Utah. According to Pinterest these are "the best biscuits EVER". Well if Pinterest says it then it must be true.

I can't put my finger on what exactly about the texture is different, but it is distinctly different from the buttermilk cathead biscuits I posted a while back. These are a bit sweeter because of the sugar and tey are definitely chewier. But maybe that's because I rolled the dough to 1 1/2 inches thick versus 1 inch as was suggested. Hey, I like my biscuits big.
One thing to note is that my biscuits never turned golden when I baked them. They stayed a very light cream color Yours may, but just make sure you keep an eye of them in the oven and use another gauge of doneness other than just color.
Is it crazy that the most distinct thing I remember about ordering those biscuits at the end of each week was that "desserts" was misspelled on Stoney's menu posted at the drive thru? It was spelled with only one "s". [Face-palm] Ugh.
I found these biscuits on (you guessed it) Pinterest. These are apparently the very famous biscuits from Ruth's Diner in Salt Lake City, Utah. According to Pinterest these are "the best biscuits EVER". Well if Pinterest says it then it must be true.
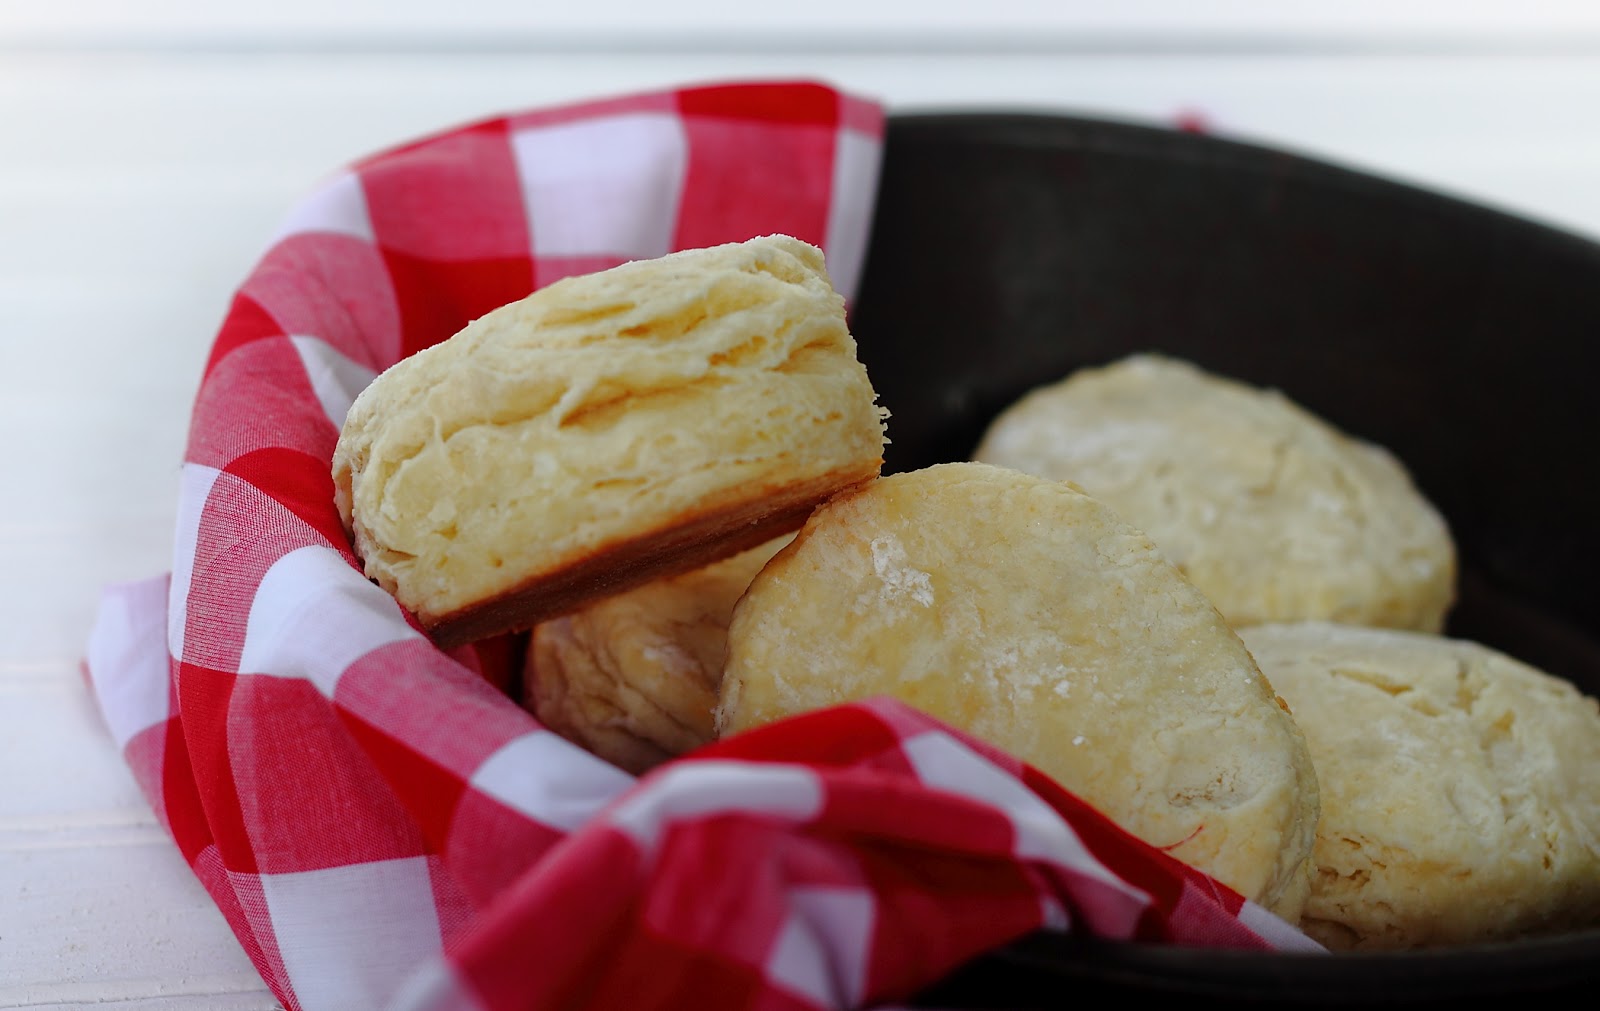
Look at those butter, flaky layers.
I can't put my finger on what exactly about the texture is different, but it is distinctly different from the buttermilk cathead biscuits I posted a while back. These are a bit sweeter because of the sugar and tey are definitely chewier. But maybe that's because I rolled the dough to 1 1/2 inches thick versus 1 inch as was suggested. Hey, I like my biscuits big.
One thing to note is that my biscuits never turned golden when I baked them. They stayed a very light cream color Yours may, but just make sure you keep an eye of them in the oven and use another gauge of doneness other than just color.
Thursday, July 19, 2012
Red Velvet Cheesecake Brownies
Two of my favorite things are red velvet cake and brownies. I've heard of several versions of brownies over the years....blondies, Reese's cup brownies, chocolate chunk brownies, m&m brownies, ones with caramel.....you name it, it's probably been done. But it was on Pinterest where I came across a red velvet version of these delicious chocolate bars.
I don't know what it is about the red color, but it just makes everything taste better. After all, a red velvet cake is nothing but a chocolate buttermilk cake that's blushing a deep red scarlet color. But I swear the color makes it taste different somehow.
These brownies were incredibly easy to put together and I loved that they were topped with a lovely layer of cream cheese. Cream cheese just adds another layer of richness. This addition isn't necessary in my opinion because the brownies themselves are so yummy, but I think it lends another flavor that complements the chocolate perfectly.

Just a word of warning....you may need to wear your stretchy pants the day after you make these because I can promise you you're going to both lick the bowl clean and then turn around and eat three (or five) of these delicious bars :)

I don't know what it is about the red color, but it just makes everything taste better. After all, a red velvet cake is nothing but a chocolate buttermilk cake that's blushing a deep red scarlet color. But I swear the color makes it taste different somehow.
These brownies were incredibly easy to put together and I loved that they were topped with a lovely layer of cream cheese. Cream cheese just adds another layer of richness. This addition isn't necessary in my opinion because the brownies themselves are so yummy, but I think it lends another flavor that complements the chocolate perfectly.

Look how moist those babies are...
Just a word of warning....you may need to wear your stretchy pants the day after you make these because I can promise you you're going to both lick the bowl clean and then turn around and eat three (or five) of these delicious bars :)

Those brownies may or may not be missing
because I ate them...only for photographic
purposes though :)
Wednesday, July 18, 2012
Veggie Stromboli
I've had my fair share of Italian dishes, but I've yet to have stromboli. I think I might have seen it in for sale at Sbarro (you know, that Italian chain that's always in malls) a few times though. As a result, it's not really ever been one of those dishes I've been itching to make. Until last week that is.
I was watching The Chew one day during lunch when Mario Batali made his version with broccoli and cauliflower. I know that for some of you that probably sounds as appealing as refried beans from a can, but for this veggie lover it struck a chord.
Because I used pre-made pizza dough, this dish took me a total of half an hour to throw together (cooking time included). I'm sure you could also prep this dish beforehand and pop it in the oven when you get home in the evening.

And there isn't really a set combination of ingredients you're supposed to stuff the stromboli with. Next time I might do chicken and pepperoni. Who knows!
PS I'm pretty sure that stromboli is usually rolled up jelly roll style, but since Mario folded his dough over that's what I did too.
I was watching The Chew one day during lunch when Mario Batali made his version with broccoli and cauliflower. I know that for some of you that probably sounds as appealing as refried beans from a can, but for this veggie lover it struck a chord.
Because I used pre-made pizza dough, this dish took me a total of half an hour to throw together (cooking time included). I'm sure you could also prep this dish beforehand and pop it in the oven when you get home in the evening.

Mmmm all rolled up and tucked in.
And there isn't really a set combination of ingredients you're supposed to stuff the stromboli with. Next time I might do chicken and pepperoni. Who knows!
PS I'm pretty sure that stromboli is usually rolled up jelly roll style, but since Mario folded his dough over that's what I did too.
Tuesday, July 17, 2012
Tuesday's Tips, Tricks and Tid-Bits ~ Chocolate
Today's post is short and sweet (literally...the topic is chocolate), but it's still something I found incredibly helpful. Think of it more of a tid-bit than a tip.
There are so many different terms for the various kinds of chocolate out there that I always end up having to google them to find out which is which. There's bittersweet chocolate, semi-sweet chocolate, milk chocolate, german chocolate....I'll stop here, lest I end up snatching up a Hershey's Dark Chocolate with Almonds mini for breakfast.
There are plenty of specifics on this topic (percentages of milk solids and cocoa), but I'm just giving you the nitty gritty basics so you'll know what means what when you're on aisle 3 at Publix :)
 Semisweet Chocolate: Dark Chocolate
Bittersweet Chocolate: Extra Dark Chocolate; also known as Unsweetened Chocolate or Baking Chocolate
Milk Chocolate: It's lighter in color, is much sweeter and is the most popular kind of chocolate found in candies.
White Chocolate: This isn't technically a type of chocolate, but rather only contains cocoa butter. It doesn't really taste like chocolate, but of vanilla or other added flavors.
There are so many different terms for the various kinds of chocolate out there that I always end up having to google them to find out which is which. There's bittersweet chocolate, semi-sweet chocolate, milk chocolate, german chocolate....I'll stop here, lest I end up snatching up a Hershey's Dark Chocolate with Almonds mini for breakfast.
There are plenty of specifics on this topic (percentages of milk solids and cocoa), but I'm just giving you the nitty gritty basics so you'll know what means what when you're on aisle 3 at Publix :)

Bittersweet Chocolate: Extra Dark Chocolate; also known as Unsweetened Chocolate or Baking Chocolate
Milk Chocolate: It's lighter in color, is much sweeter and is the most popular kind of chocolate found in candies.
White Chocolate: This isn't technically a type of chocolate, but rather only contains cocoa butter. It doesn't really taste like chocolate, but of vanilla or other added flavors.
Monday, July 16, 2012
Six Layer Caramel Cake
Besides ice cream cake, the hubby's sweet treat of choice is a good ole classic yellow cake with caramel frosting. I've almost made one several times over the years, but the thought of trying to conquer a caramel icing always leaves me opting for either a store bought one or a quick trip to the local Dairy Queen for that ice cream cake. I've heard horror stories about this frosting, and I'd rather not spend hours trying to make it only to have to face the poor boy and tell him that there won't be a birthday dessert after all. And if I were really honest I just don't like the possibility of failing.
However, I had a change of heart a few weeks ago when he turned the ripe old age of 27. This was his first birthday we were celebrating as a married couple. Plus, he does so much for me each and every day that I figured I could put forth some extra effort and give it a go. Seriously, marrying this boy was the best decision I've ever made. And so I owed him a cake. One made of from scratch with plenty of love. And with plenty of blood and sweat and tears. Okay, I may have been exaggerating on that last part, but still.
After some searching I decided to tackle two recipes from one of my favorite sites, AllRecipes. I have such a love affair with this site because there are plenty of ratings and reviews which give you a good idea of which recipe is the best. There are also plenty of suggestions written in by such reviewers which can help you with any troubleshooting. Both the yellow cake and caramel frosting recipes came from this site and I must say I was incredibly pleased.
All that being said, I definitely wouldn't start with this cake if you're not comfortable with layer cakes. The six layers are very thin and can be tricky to manage if you're not used to transferring and stacking them in multiples.
And of course caramel frosting is a whole other animal. Unlike buttercream or cream cheese frosting, it stiffens and sets very quickly, so you have to work very fast. This was my first time working with it, so hopefully I'll get more of the hang of it with each passing go-round.
But this cake was unbelievably moist and the frosting was the perfectly rich complement to the buttery layers. Yes, it was time consuming and expensive to make (12 egg yolks?!), but it was oh so worth every bit of it. Don't let my review of the complexity of it scare you....I just want to make sure a first time cake baker doesn't take a whirl with it and then get frustrated when it flops :)

The recipes below have been altered quite a bit with regards to the quantity they yield. The original yellow cake recipe makes 2 larger layers and frosting recipe listed below makes 6 times the original amount. Link back to the main source for smaller quantities.
However, I had a change of heart a few weeks ago when he turned the ripe old age of 27. This was his first birthday we were celebrating as a married couple. Plus, he does so much for me each and every day that I figured I could put forth some extra effort and give it a go. Seriously, marrying this boy was the best decision I've ever made. And so I owed him a cake. One made of from scratch with plenty of love. And with plenty of blood and sweat and tears. Okay, I may have been exaggerating on that last part, but still.
After some searching I decided to tackle two recipes from one of my favorite sites, AllRecipes. I have such a love affair with this site because there are plenty of ratings and reviews which give you a good idea of which recipe is the best. There are also plenty of suggestions written in by such reviewers which can help you with any troubleshooting. Both the yellow cake and caramel frosting recipes came from this site and I must say I was incredibly pleased.
All that being said, I definitely wouldn't start with this cake if you're not comfortable with layer cakes. The six layers are very thin and can be tricky to manage if you're not used to transferring and stacking them in multiples.
And of course caramel frosting is a whole other animal. Unlike buttercream or cream cheese frosting, it stiffens and sets very quickly, so you have to work very fast. This was my first time working with it, so hopefully I'll get more of the hang of it with each passing go-round.
But this cake was unbelievably moist and the frosting was the perfectly rich complement to the buttery layers. Yes, it was time consuming and expensive to make (12 egg yolks?!), but it was oh so worth every bit of it. Don't let my review of the complexity of it scare you....I just want to make sure a first time cake baker doesn't take a whirl with it and then get frustrated when it flops :)

I hope you enjoy these pics, because
I had to cut the cake before presenting it to the hubby
in order to get a few good snaps.
The recipes below have been altered quite a bit with regards to the quantity they yield. The original yellow cake recipe makes 2 larger layers and frosting recipe listed below makes 6 times the original amount. Link back to the main source for smaller quantities.
Friday, July 13, 2012
Quick and Easy Stir Fry with Noodles
Many apologies for being MIA yesterday. I fully intended to post this and then got sidetracked. And by sidetracked I mean a stranger rang our doorbell yesterday afternoon and I went full swing into all of the Criminal Minds and and CSI possibilities.
I'm sure the person was harmless, but instead of being normal and answering the door I crawl into our bedroom to peak and scope the person out through the blinds. Then of course I go through the entire list of (highly unlikely) scenarios.....if they got in through the front door I could grab my phone and run back to our bathroom. Then they would have 3 doors (bedroom, closet and bathroom) to get through before they got to me. By then surely the cops would have arrived.
Or if they came in through the back porch I could run to the computer room. But then they would only have 1 locked door to get through.
Better hope they come in through the front door....
Seriously?! I get overly dramatic when it comes to things like that. Needless to say, I didn't get this recipe posted yesterday. Whoops.

This stir fry is easy, full of flavor, and highly adaptable. You can add any veggies or protein you like depending on what you're in the mood for. I chose chicken and a combo of fresh broccoli and bagged rainbow slaw (shredded broccoli, cabbage, cauliflower and carrots) just because I didn't feel like chopping veggies all night long. But add whatever you're craving.
Also, the recipe makes quite a bit of sauce. I double the recipe from the original post because I ran out. I'd rather have too much than not enough :)
Wednesday, July 11, 2012
Best Ever Buttercream Frosting and Funfetti Inspired Whoopie Pies
For me, funfetti is quite nostalgic. I always think of that Pillsbury boxed cake mix that was the first choice of little girls ages 3-12 when I grew up. Okay, okay...I still love it to this day and I'm 26.
Any time I eat anything funfetti I'm immediately thrown back to the good ole days on the playground in elementary school. You finally make it outside with all your classmates and the first thing you do is go for your snack. My favorites were always Dunkaroos, Fruit Roll Ups and Gushers. Do any of those ring a bell?? I still remember when Dunkaroos came out with their funfetti inspired frosting...that was my all time fave.
Do you think they still sell those? I think it might be time to meander on over to Kroger and take a gander at the snack aisle :)
The cookies below are my adult version of a funfetti dessert. You could definitely just make the cookies alone, but why not sandwich a dollop of beautiful buttercream with them? You get two cookies instead of one, and the frosting is to die for. I seriously think it might replace my go-to cream cheese frosting that I always use.
PS Don't leave any extra frosting sitting around unless you're okay with the fact that you ARE going to eat every last bit of it.....this stuff is dangerous.

There aren't any photos of me making the frosting so I'm adding in photos of the whoopie pies I put together with this frosting. Enjoy!
Any time I eat anything funfetti I'm immediately thrown back to the good ole days on the playground in elementary school. You finally make it outside with all your classmates and the first thing you do is go for your snack. My favorites were always Dunkaroos, Fruit Roll Ups and Gushers. Do any of those ring a bell?? I still remember when Dunkaroos came out with their funfetti inspired frosting...that was my all time fave.
Do you think they still sell those? I think it might be time to meander on over to Kroger and take a gander at the snack aisle :)
The cookies below are my adult version of a funfetti dessert. You could definitely just make the cookies alone, but why not sandwich a dollop of beautiful buttercream with them? You get two cookies instead of one, and the frosting is to die for. I seriously think it might replace my go-to cream cheese frosting that I always use.
PS Don't leave any extra frosting sitting around unless you're okay with the fact that you ARE going to eat every last bit of it.....this stuff is dangerous.

Funfetti inspired whoopie pies made with
this buttercream.
There aren't any photos of me making the frosting so I'm adding in photos of the whoopie pies I put together with this frosting. Enjoy!
Tuesday, July 10, 2012
Tuesday's Tips, Tricks and Tid-Bits ~ The Joys of Oil and Boiling Water
I'm not sure about you, but my days are still all screwy from last week. Getting the 4th off was just fabulous, but I keep thinking that today should be Friday for some reason. Too bad it's not. Fridays are full of good things: usually a trip to Longstreet Cafe for a bacon and egg biscuit, sushi date nights with the hubs, maybe ice cream afterwards. Then Friday means Saturday is next, which means I sleep in late and then cook a scrumptious breakfast that probably takes quite a bit more effort than my weekday breakfasts.
Hhhmm all of these things seem to revolve around food. Oddly enough I did not realize that until I typed it all out.
But alas today is not Friday. It's only Tuesday. Which means another edition of tips, tricks and tid-bits. Aren't you excited??? Hopefully these posts are helpful to you....if they aren't PLEASE feel free to leave me a comment suggesting other topics. Do you always have trouble with layer cakes? Can't ever get your dough to rise properly? Whatever it is, if I'm not covering it, just shout it out. Or type it, rather I should say. And if I don't have an answer to your question I'll find it.
Alright, back to today's tip: Adding a bit of oil to your pot of boiling water. Did you know that by adding just a bit of oil (just a drizzle) to your pot of boiling water you will prevent it from foaming over? You know, you run to the other room for just a sec and come back to your pot boiling over with tons of foamy bubbles. And then you have the resulting stain from the spillover to clean off your stovetop range. Can you tell I've had quite my fair share of experiences with this?
Good news: the oil will put a quick stop to that. Yes, you can get your water up to a roaring bubble, but it won't ever foam up and over the side if there's oil in there.

Bonus Pro: If it's pasta you're making in that pot of boiling water the oil will also keep your noodles from sticking together. Two birds with one stone :)
PS: Please for the love of Pete add the oil to the water BEFORE heating it. If 3rd grade science taught us anything it's that oil and water don't mix. So you add some oil to that already boiling water and it's going to pop right back at you. And by "pop" I mean explode.
Hhhmm all of these things seem to revolve around food. Oddly enough I did not realize that until I typed it all out.
But alas today is not Friday. It's only Tuesday. Which means another edition of tips, tricks and tid-bits. Aren't you excited??? Hopefully these posts are helpful to you....if they aren't PLEASE feel free to leave me a comment suggesting other topics. Do you always have trouble with layer cakes? Can't ever get your dough to rise properly? Whatever it is, if I'm not covering it, just shout it out. Or type it, rather I should say. And if I don't have an answer to your question I'll find it.
Alright, back to today's tip: Adding a bit of oil to your pot of boiling water. Did you know that by adding just a bit of oil (just a drizzle) to your pot of boiling water you will prevent it from foaming over? You know, you run to the other room for just a sec and come back to your pot boiling over with tons of foamy bubbles. And then you have the resulting stain from the spillover to clean off your stovetop range. Can you tell I've had quite my fair share of experiences with this?
Good news: the oil will put a quick stop to that. Yes, you can get your water up to a roaring bubble, but it won't ever foam up and over the side if there's oil in there.
I usually use olive oil, but canola or vegetable oil will work too.

Bonus Pro: If it's pasta you're making in that pot of boiling water the oil will also keep your noodles from sticking together. Two birds with one stone :)
PS: Please for the love of Pete add the oil to the water BEFORE heating it. If 3rd grade science taught us anything it's that oil and water don't mix. So you add some oil to that already boiling water and it's going to pop right back at you. And by "pop" I mean explode.
Monday, July 9, 2012
Quick and Easy Puff Pastry Dough and Sweet Peach Tarts
Puff pastry is one of those things that, frankly, has always scared the bejesus out of me. This type of pastry has many, many tiny layers and when it bakes, each of these layers puffs up so you can see each buttery plane. Thus, the name.
I'm fairly comfortable making pie crust, pizza dough, biscuits and the like, but the thought of constructing all of these little layers kind of makes me want to sprint to the frozen foods section of the Publix up the street and just pay the $4 for a package of it.
But on a recent Saturday I had some time on my hands and thought, why the heck not? I didn't inform the hubby of my endeavor so that if flopped I wouldn't have anyone to explain it to anyone.
However the pastry turned out to be so much easier than I could have ever imagined. No, really. Yes, it takes a bit of time, but it took much less time and effort than I was expecting. And boy was it worth it. I've never had frozen puff pastry so I don't have anything to compare it to, but I will say that each of those buttery, flakey layers was just divine. And I must admit that I certainly ate more of those said layers than I probably should have. Whoops.


You can use this puff pastry for quite a variety of delicacies, but I chose top little squares of mine with fresh peaches, honey and brown sugar for a tart. Yes please!
Friday, July 6, 2012
Follow Confections from the Cody Kitchen by Email!
We FINALLY have a feature which allows you to follow the blog via email. Make sure you don't miss a post by subscribing in the little box to the right, appropriately titled "Follow by Email".
And of course make sure to keep in touch with us via our Facebook and Twitter pages ~ icons are listed on the right sidebar of the blog that will link you up with us.
Thanks for stopping by and stay tuned for more yummy dishes!
And of course make sure to keep in touch with us via our Facebook and Twitter pages ~ icons are listed on the right sidebar of the blog that will link you up with us.
Thanks for stopping by and stay tuned for more yummy dishes!
German Chocolate Whoopie Pies with Pecan Coconut Frosting
I normally do a links post at the end of every week, but since Wednesday was a holiday and I was MIA I'm deciding to do a recipe post. That and I was super anxious/excited to share these amazing whoopie pies.
In recent years I've developed a slight love affair with German chocolate cake that's only gotten worse as time has passed. For the longest time I kind of wanted to gag at the thought of coconut in frosting, but once I tried it there simply was no looking back. I've never actually made a German chocolate cake myself, but have enjoyed more than my fair share of cake and cupcakes from bake shops.
And to be honest I've always been a little scared of trying to make this type of cake because it always looks like the frosting is so gooey that it might just slide right down the side of the cake. Yikes!

But these whoopie pies solve that whole issue. Just sandwich that frosting between two soft cake mix cookies ~ problem solved. And my favorite thing is that these cookies are built around a boxed mix. The cookies are quick and easy, which means I don't mind spending the extra bit of time on the frosting.
*Tip: Pull the cookies out of the oven when they seem a little underdone...they will set up perfectly by the time they cool!
PS Make sure you use all the frosting for the whoopie pies....if you have any left over I can promise you it will somehow make its way from the spoon to your tummy. Swear.
Thursday, July 5, 2012
Sweet Potato Scones
I hope everyone had a great 4th! I sure did. Lots of good food. LOTS of it.
The hubby's 27th birthday was Tuesday and we have celebrated with 3 birthday dinners and no less than 3 birthday cakes. Yes, you read that right. Three. Two ice cream cakes and one caramel cake. Sugar detox anyone??
These babies might help do the trick. Well, minus the brown sugar glaze. Okay, so maybe they won't do the trick. But they are yummy. And I guess you could reason that the sweet potato in them makes it a healthy option. Maybe.
These scones were incredibly tasty, but I will admit they were incredibly frustrating to make. My dough wasn't anywhere near firm enough so I had to keep adding more flour. I almost didn't post these because of this, but everyone else who rated the recipe raved about it, so maybe it was something I did wrong. I'm going to try them again sometime soon and see if they turn out better. The taste was phenomenal, but I just had a hard time shaping the dough because of the texture. The measurements for the original recipe were first given in grams, so maybe when they converted everything something got messed up. I'll investigate and will be sure to post a follow up.
So if you make these know that you may need to add more flour.

If you're looking for a healthier option you could always opt out of the brown sugar glaze. But it's so yummy I wouldn't recommend it :) Delish!!
The hubby's 27th birthday was Tuesday and we have celebrated with 3 birthday dinners and no less than 3 birthday cakes. Yes, you read that right. Three. Two ice cream cakes and one caramel cake. Sugar detox anyone??
These babies might help do the trick. Well, minus the brown sugar glaze. Okay, so maybe they won't do the trick. But they are yummy. And I guess you could reason that the sweet potato in them makes it a healthy option. Maybe.
These scones were incredibly tasty, but I will admit they were incredibly frustrating to make. My dough wasn't anywhere near firm enough so I had to keep adding more flour. I almost didn't post these because of this, but everyone else who rated the recipe raved about it, so maybe it was something I did wrong. I'm going to try them again sometime soon and see if they turn out better. The taste was phenomenal, but I just had a hard time shaping the dough because of the texture. The measurements for the original recipe were first given in grams, so maybe when they converted everything something got messed up. I'll investigate and will be sure to post a follow up.
So if you make these know that you may need to add more flour.

Can we take a moment and talk about how I'd love to
scoop up that little pool of glaze right there??
Tuesday, July 3, 2012
Tuesday's Tips, Tricks and Tid-Bits ~ Cookie Troubleshooting
It's so incredibly easy for things to go wrong in the kitchen. You measure in an extra 1/4 C flour because you don't properly level it off, you use baking powder instead of baking soda, you correctly use baking soda but it's not fresh, you didn't let your butter come to room temp.....the list could literally go on and on and on.
Baking really is nothing but a chemical reaction amongst ingredients to form your final product. And I didn't exactly do too well in Chemistry 101 at UGA. Let's just say it singlehandedly changed my mind about becoming a Pre-Pharmacy major.
You usually think of cookies as an easy option when it comes to desserts. Or at least I do. I mean, Pillsbury sells these things as break and bake and slice and bake and you always see 5 years olds baking them in the commercials. So it can't be that hard to do these things from scratch, can it? Well, usually not. But even the most miniscule of common mistakes can result in a panicked trip to the local bakery for those cookies you promised to bring to the get together tonight because yours flat out flopped.
Below is a quick chart to help you with the trouble shooting. The bad news is that by the time your cookies turn out like some of the ones below, you've already wasted part or all of a batch. But the good news is that this handy dandy chart will help you know how to fix any issues you have in the future.
*The chart below is geared more towards chocolate chip cookies that call for the dough to be chilled, but I've still found it incredibly helpful when troubleshooting issues with other types of cookies.
Make sure to hop over to The Perfect Chocolate Chip Cookie for more details regarding that perfect cookie. It's a phenomenal resource!

1. This cookie is your default cookie by which to compare the rest. It is the one that is considered to be the most "perfect".
2. This dough was not chilled properly in the fridge and therefore spread more than it should. You can tell that it's a little flatter than the rest.
3. This dough contained too much flour. The dough probably looked identical to the "right" dough, but the cookie turned out drier and denser and did not spread properly.
4. This dough didn't have enough flour. As opposed to cookie #3 it spread too much and cooked faster around the perimeter than it did in the middle.
5. This dough was over-mixed, which is such a common mistake with cookies. The texture and the color are off as a result.
6. This dough was formed into too-small portions and therefore overcooked based on the recommended bake time. Smaller portions are always fine, but just make sure you adjust the baking time accordingly. Keep an eye on them!
7. Alternately, this dough was formed larger than the suggested portion size and therefore did not bake completely in the middle. Again, make sure to adjust your baking times accordingly.
8. This dough was baked in an oven with the temperature 25 degrees above where it should have been. As a result the cookie baked too fast and turned out dry and overdone.
9. On the other end of the spectrum, this dough was baked in an oven 25 degrees too cool. The cookie turned out flat and didn't set up properly.
10. This dough was still frozen when baked. Freezing baked goods is always fine, but make sure you let them sit at room temperature for 15-25 minutes before sticking them in the oven. This allows them to thaw just a bit while still remaining chilled.
BONUS TIP FROM YOURS TRULY: A cookie that is done in the oven will end up being overdone in the end. The cookies are still so hot when you take them out of the oven that they continue to bake just a bit afterwards. You want them slightly underdone when you take them out so that they are perfect by the time they set up and cool.
Monday, July 2, 2012
Vegan Sweet Potato Burger
Before you write this recipe off and don't even take a gander, let me say that I promise that vegan dishes can be yummy. Swear. I get that when you think "burger" you're thinking meat, be that beef, turkey or bison. But this sweet potato burger was just divine in my humble opinion. I even got the thumbs up from my meat-loving hubby too!

They are a bit frustrating to make because you're working with a much softer base that falls apart easily, but as long as you're not shy with the breadcrumbs (bring em on!), then they turn out great. They still tend to fall apart as you eat them, but that's okay with me because they are so tasty that I was perfectly fine finishing my burger with a fork.

You can top these burgers with anything you like, but I chose avocado and onion based on the suggestions from the original blog that posted this recipe. Healthy Happy Life is linked up below in the recipe, so make sure to mosey on over and check them out if you're even remotely interested in other vegan dishes.
PS Can we just talk about how hot these past few days have been? Yikes! I think I may use some leftover chocolate cookies I have to make a milkshake this afternoon....check back for the recipe!
Subscribe to:
Posts (Atom)