My mom's birthday (I won't tell you which) was this past week and for her big day she requested none other than a red velvet cake. Red velvet is her absolute favorite and is subsequently my favorite as well. Something about the bright red color just makes it taste better.
A while back I posted about making red velvet cupcakes. You can revisit that post here. The cupcakes were super moist, but almost too moist (if that's even possible). As a result I reduced the vegetable oil to 1 1 1/4 C which fixed the issue.
Red Velvet Cake
2 1/2 C cake flour
1 1/2 C sugar
1 tsp baking soda
1 tbsp cocoa powder
1 tsp salt
2 eggs
1 1/4 C vegetable oil
1 C buttermilk
2 tbsp red food coloring
1 tsp vanilla extract
1 tsp white distilled vinegar
Cream Cheese Frosting
8 oz cream cheese
1/2 C unsalted butter, softened
4 C confectioners sugar
1 tsp vanilla
*I doubled this recipe for the cake
Preheat oven to 350 degrees. Grease and flour 3 9-inch cake pans and set aside.
Sift together flour, sugar, baking soda, cocoa and salt in medium bowl. Beat eggs, oil, buttermilk, food coloring, vanilla and vinegar in electric mixer until well combined. Slowly add dry ingredients and beat until smooth, about 2 minutes.
Divide batter evenly among prepared cake pans. Bake in preheated oven for approximately 18 minutes, or until toothpick inserted into center of cake comes out clean. Turn the cakes out onto wire cooling racks and let cool completely.
When the layers are almost completely cooled you can begin the frosting. I usually combine the butter, cream cheese and vanilla first and then gradually add the confectioners sugar. This keeps you from being consumed in a big poof of sugar if you were to add all 4 cups at once.
Next is one of the most important steps of making a layer cake: leveling the cake. I'm a little ashamed to admit this is a step I had skipped in the past, but it really does make such a big difference when it comes to making sure each of the layers are even. When the layers are even they stack perfectly so that you don't have a lopsided or droopy cake.
A leveled cake on the left vs an unleveled one on the right.
Next up is the actual stacking of the layers. I always place the top of layer (the leveled side) down to cut down on the number of crumbs I have to worry about.
Sandwich the frosting between the layers. *Notice the layers are top side down*
One of the best ways to get an even coat of frosting is to do a crumb coat first. Simply cover the three layers with a thin coat of frosting (it doesn't have to be neat) and then place in the fridge for approximately 10 minutes.
This crumb coat ensures you a nice clean and firm (and crumb free) base on which to distribute the remaining frosting.
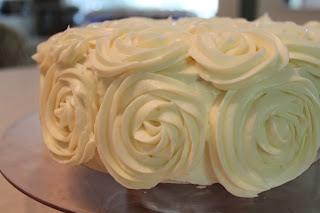
For this cake I decided to try something a bit different since it is a birthday cake after all. I don't have fancy decorating skills, but loved the idea of rosettes covering the cake. Wilton's 1M tip is perfect for this.
After covering your cake with a crumb coat, go over it one more time to make sure you cannot see any cake peaking through. Then use a piping bag with the 1M tip to pipe swirls (rosettes) all over the cake.
Voila!!!
Time to dig in!
And the inside of course. This photo is much more true to color....I used a
different lens on all of the other shots.
On another note, I plan to begin selling my cakes next week. Which means.....more cake recipes to come!! Stay tuned!!


No comments:
Post a Comment
I LOVE hearing from those who stop by to take a gander at the blog! Feedback and comments of all kinds are always greatly appreciated :)
Love,
Morgan