Showing posts with label Desserts. Show all posts

Friday, April 20, 2012

Friday Links

Happy Friday!  Can you believe the weekend is here again already?  For me, the weeks have flown by lately, which is always a good thing.  

Today brings yet another weekly addition of Friday Links.  And I guess you could call this Friday Links:  Desserts Edition because every single link below has sugar in it in some form or fashion.  

Make sure and click on each link below to check out the original recipe along with other fabulous photos.  Check these awesome bloggers out and leave them some love!

Wednesday, March 21, 2012

Soft Almond Sugar Cookies

**UPDATE:  A few commenters noted that they had issues with the cookies spreading a bit more than what was depicted in the photos.  A few also mentioned that the cookies were a bit on the salty side.  I've revisited this recipe as of tonight, 11/12/2012, and have posted a new and improved version that gives you the soft, chewy cookies you're seeing in the photos.  A little more cake flour and corn starch, and a little less salt fixed the issue.  Thank you so, so much for your patience :)

This past weekend the hubby and I went to eat Sunday lunch with my family.  My mom and sister were in charge of the salad and lasagna (both were amazing by the way) so that left the dessert to me.  I always love whipping up anything with sugar, so this was fine with me :)

I had originally planned on taking Irish Car Bomb Brownies, but those were a HUGE flop (I'll share more about that later this week).  So I was back to square one.  I didn't want anything super heavy since we were already eating lasagna, and I thought about doing a cookie since I haven't blogged many such recipes.

I feel like the sugar cookie is something that, for the most part, everyone loves.  Some people have different aversions when it comes to things like oatmeal raisin (raisins?  ew!) or chocolate chip (some like thick and fluffy, others like thin and "greasy"), but no one can really complain when it comes to good 'ole plain sugar cookies.

I like my sugar cookies thick, fluffy, chewy and soft.  Cornstarch is an ingredient that keeps baked goods from spreading, so I knew I wanted to add some into this recipe to keep the cookies from getting too flat.  I played around with the proportions and ingredients (using both cake flour and all purpose) and settled on the recipe below.

I love me some almond flavoring, but you could definitely flavor these to your liking.  I love the twist that almond extract gives these cookies, but using another extract won't affect the texture of the cookie.


I'm not trying to toot my own horn, but these are the best sugar cookies I've ever had.  No lie.  I made them pretty small, but I'm sure you could make them larger if you were willing to adjust the baking time.

Enjoy!

Soft and Chewy Almond Sugar Cookies CCK Original
(Printable Recipe)
1 1/2 C white sugar
2/3 C unsalted butter (cold)
2/3 C shortening (room temp)
2 eggs
2 tsp almond extract
2 3/4 C cake flour
1 C all purpose flour
1 Tbsp cornstarch
2 tsp baking powder
1/2 tsp salt
sugar in the raw (I like raw sugar for this, but any coarse sugar  or sprinkles would work)

Preheat oven to 350 degrees and prepare baking sheet.

Cream sugar, butter and shortening.  Stir in eggs and almond extract.  Combine flour, cornstarch, baking powder and salt and add to butter/egg mixture.

Use electric mixture to ensure dough is thoroughly combined.

Chill dough in fridge for 30 minutes.


Roll 2 tsp of dough (I used a small cookie scoop to make things easier) into a ball and roll in raw sugar.  Place on prepared pan.


Bake cookies for 7 minutes.  Remove from oven and gently press the tops of the cookies flat with the back of a spoon while they are still warm and pliable.  (The cornstarch keeps them from spreading so they will be mounded up).

Return bowl of dough to fridge in between baking batches.

Remove to cooling rack.  Allow to cool completely.


A tip:
~DO NOT bake longer than 7-8 minutes!!  They may seem under-baked, but when they cool they will firm up.

Thursday, March 8, 2012

White Chocolate Covered Black Cherry Oreos

Tuesday, March 6 was Oreo's 100th birthday, so in honor of the chocolate and cream sandwich cookie I thought I'd create a twist on the classic.  I've often seen Oreos dipped in chocolate or coated with peanut butter (which are amazing).

I wanted to do something a little different and loved the idea of adding in a fruit flavor.  I've seen Oreos paired with raspberries several times, so I settled on using the flavor of black cherries.


These little guys are very easy to assemble and I think the use of black cherry preserves make for a fun and tasty unexpected surprise.  Just make sure you don't keep these things around the house for too long...they're addictive!

One thing I'd like to note about this recipe is that it isn't one of those where if you're off my a smidgen it will kill the whole thing.  The ratio of preserves to powdered sugar just seemed to be what gave the fruit a firmer consistency.

And last, but not least, I wanted to point out that you might notice something different about this post....can you guess what it is??  Well, first off there is a page break and then you "read more" to get the recipe.  I think this change will make for a cleaner home page.

I've also added a printable recipe link to this post.  How annoying is it to have to drab your entire laptop into the kitchen just to recreate something?  Well, this solution takes care of that :)  I'll be working on updated all posts with this new feature, so stay tuned!

Monday, March 5, 2012

Raspberry Brownie and Cheesecake Ice Cream ~ A Base Recipe

I don't know about you, but I eat yogurt and ice cream all through the cold months even though it's typically considered a "hot weather" treat.  This is precisely why one of the first things I registered for at Bed Bath and Beyond was a Cuisinart Ice Cream Maker.  My family gave it to me as a gift at my Favorite Things shower and I have been itching to use it ever since.

This past week presented the perfect opportunity.  And by opportunity, I mean that I had some left over raspberry cream cheese brownies that I needed to get rid of before I ate every single last bite that I had left.  I also had some remaining cheesecake from a date night that Trey and I had enjoyed at The Palm in Atlanta a few days before.  Brownies and cheesecake in ice cream?  Um, yes please.


For the base of the ice cream I used a recipe from Jeni's Splendid Ice Creams.  Jeni's is based out of Ohio but ships their ice cream nation wide.  I've ordered some before and must say it's hands down the best ice cream I've ever eaten.  Ever.  I know that's a pretty heft claim, but once you take a spoonful I'm willing to bet you'll agree as well.

I simply prepared the base, processed it in the ice cream maker, and then added my raspberry cream cheese brownies and cheesecake bits.  The best thing about this recipe is that it's just a base recipe, which means you can build it whatever way you like.  Add fruit, candy, chocolate, ....the list is endless.  Personalize it and make it yours :)

Jeni's Splendid Ice Cream Base courtesy of Jeni's Splendid Ice Creams at Home
2 C milk
4 tsp cornstarch
1 1/4 C heavy cream
2/3 C sugar
2 Tbsp light corn syrup
1/4 tsp kosher salt
3 Tbsp cream cheese, softened

*I doubled this recipe in case you're wondering why my portions look so much larger in my photos.

Stir 1/4 C milk and cornstarch together in bowl.  Set slurry aside.  (Why it's called slurry I'm not sure....I'll research that one for ya.)


In 4 qt sauce pan whisk together heavy cream, sugar, corn syrup, salt and remaining milk (1 3/4 C).  Bring to boil over medium high heat.  Cook for 4 minutes.  Stir in slurry.  Continue cooking, stirring until thickened (approximately 2 minutes).


Place cream cheese in separate large bowl and pour in 1/4 C hot milk mixture from saucepan.  Whisk until combined and smooth.  Add in remaining milk mixture from saucepan and stir to combine.


Allow mixture to cool slightly.  Pour into plastic zip loc bag, seal and submerge into bowl of ice water until chilled.

Pour mixture into ice cream maker and follow instructions from manufacturer.  Pour into sealable container and place in freezer until set.

*If you want to add anything to the ice cream you need to do so AFTER you process the ice cream in the ice cream maker, but BEFORE you set it in the freezer.  Just make sure you layer it and freeze as you go.  Otherwise all of your added pieces will just float straight to the top.  i.e. Add a layer of ice cream, top with brownies, freeze completely.  Then repeat over and over.

Cutting up the raspberry cream cheese
brownies and cheesecake into bite sized pieces

Layering the ice cream and added ingredients

This is my husband's bulldog, Moe.  She was not happy
that I was keeping her up past her bedtime.  Can
you tell?? :)

Mmmmmm

Add some fresh raspberries to the dish to 
brighten the flavor


Friday, March 2, 2012

Raspberry Cream Cheese Brownies

Did the title reel you in?  How heavenly do these sound?  Brownies are always fabulous,  raspberries might be my favorite fruit and cream cheese of course is a gift from God Himself.  So the thought of combining all of these things into one dish just blew my mind.

I'm a very big fan of boxed brownies, so the decision to make some from scratch was not a light one.  If the boxed variety works so well, why bother going through all the motions just to come out with the same thing?  Well, that's where these brownies differ.

I don't know how to explain it, but they have a completely different texture than boxed brownies do.  The raspberries perfectly complement the dark chocolate, while the cream cheese add the perfect amount of softness to the brownies.


My other favorite thing about these brownies is that they could be easily adapted to suit your taste.  Don't like raspberries?  Use strawberry jam.  Try out orange.  Get creative and find the combo you love!

Raspberry Cream Cheese Brownies courtesy of Brown Eyed Baker
8 oz cream cheese at room temp
1 1/2 C granulated sugar, divided
1 egg yolk
2 1/4 tsp vanilla extract, divided
2/3 C all purpose flour
1/2 tsp baking powder
1/2 tsp salt
8 Tbsp unsalted butter, cut into pieces
4 oz unsweetened chocolate, chopped
1/2 C raspberry jam, divided
3 eggs

Preheat oven to 350 and line 8 inch square baking pan with parchment paper along the bottom of the dish.  Lightly grease the dish.

Chopping the dark chocolate...I might have
snuck a bite ;)

Process cream cheese, 1/4 C granulated sugar, egg yolk and 1/4 tsp vanilla in food processor until smooth (I used a hand held mixer in a separate bowl).  Set aside.


Whisk together flour, baking powder and salt in small bowl.  Set aside.  Microwave butter and chocolate in separate bowl until melted and smooth, opening microwave periodically to stir.    Whisk 1/4 C raspberry jam into chocolate mixture and whisk until smooth.  Allow to cool slightly.

Add remaining 1 1/4 C sugar, the 3 eggs, and remaining 1 1/4 tsp vanilla to chocolate mixture, stirring until combined.  Add flour mixture and stir until incorporated.

Microwave remaining raspberry jam until smooth and slightly melted (about 30 sec).  Stir to smooth and cool.  Scrape half of brownie mixture into pan, top with cream cheese mixture.  Smooth out to get even.  Then top with raspberry jam.  *This is where I added my layer of fresh raspberries.  Spread remaining brownie batter over top.

Fresh raspberries over top the cream cheese

And the final layer of chocolate batter...

Bake 50-60 minutes or until toothpick inserted comes out clean.  Cool completely (approximately 2 hours) before removing from pan.

Layers of chewy, moist goodness

Friday, February 24, 2012

Fluffiest, Chewiest Best Chocolate Chip Cookies EVER

So I know that Friday is supposed to be all about my Friday Links posts, but I had a few extra entries this week that I wanted to share.  Hopefully you don't mind :)

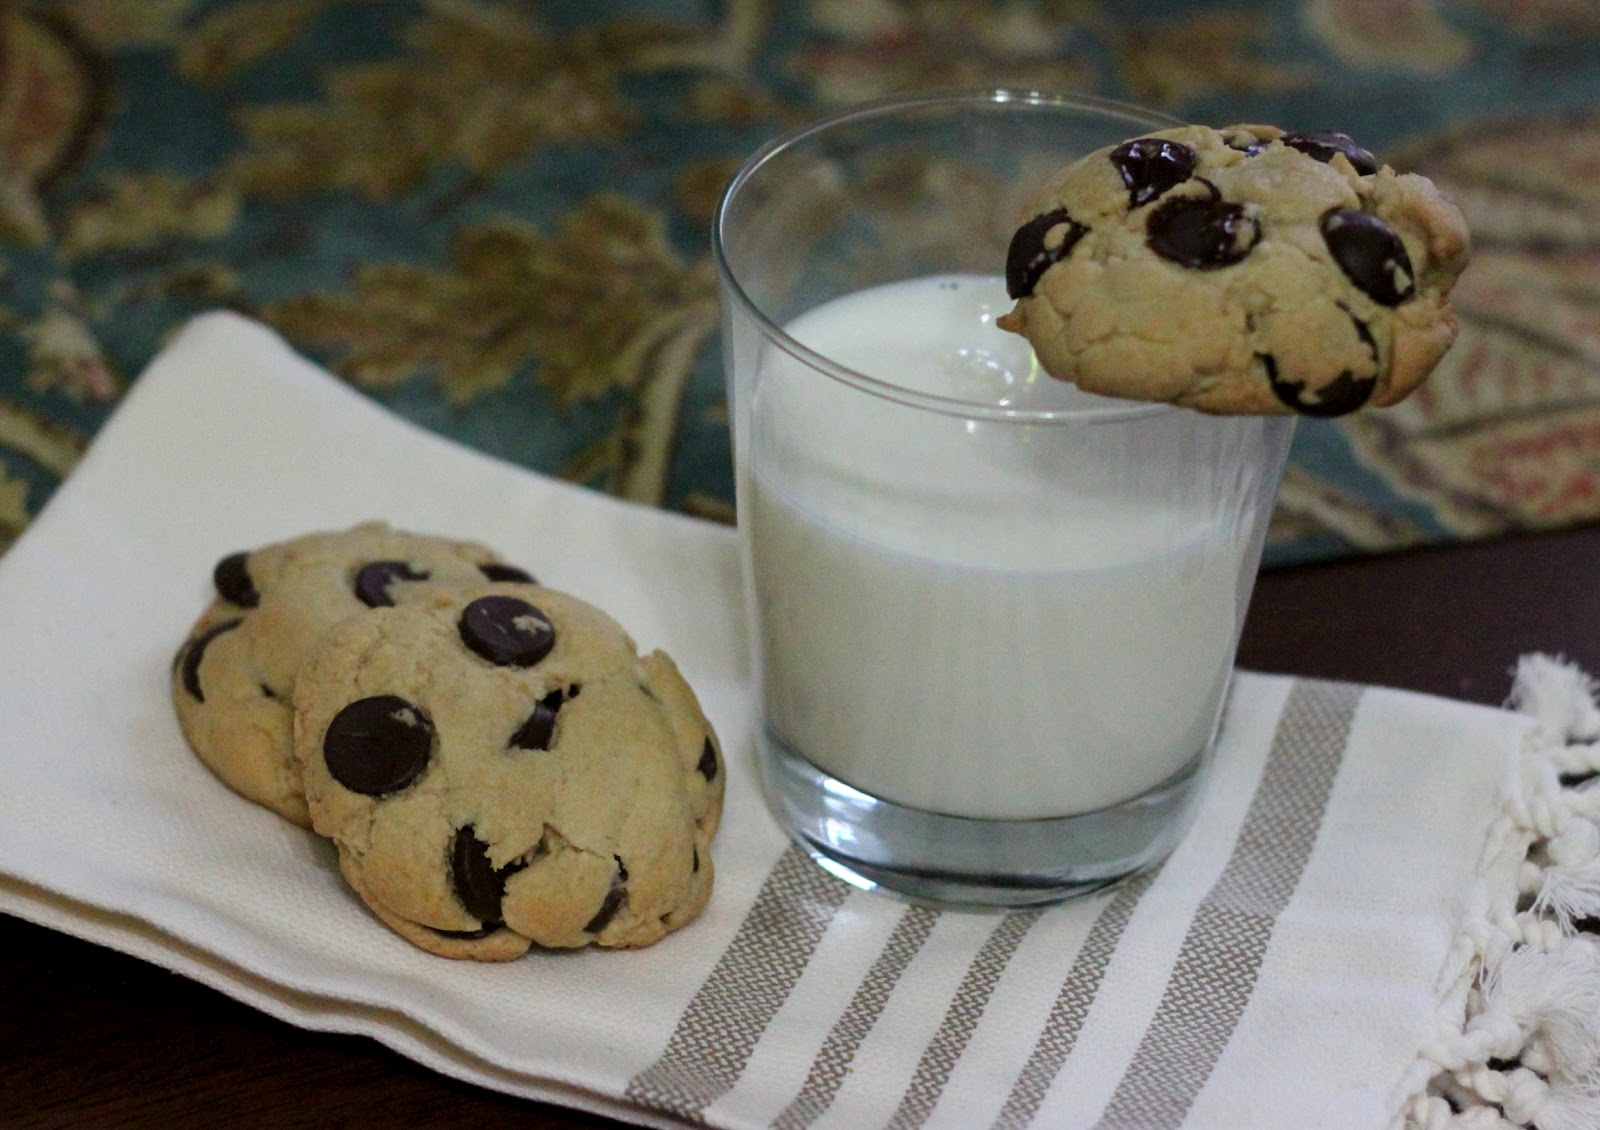
Do you think my title is convincing enough?  I tried.  But seriously, these are some of the best cookies you will ever eat.  I know lots of people claim to have great chocolate chip cookies, but these really do take the cake (or the cookie).   They are chewy, moist, and fluffy.  I use the word fluffy a lot when describing foods I love.  I think that might be because if a food is fluffy it means there is more of it.  And that, my friends, is always a good thing.

I originally saw these on Pinterest and hopped on over to Kelsey's Apple a Day blog to see what these rounds of sugar were all about.  They had received rave reviews, so I decided to take a go at them.

Oh dear were they fabulous!  It took a while to figure out exactly how to bake these things in order for them to come out just right, but once I got that part down the rest was smooth sailing.

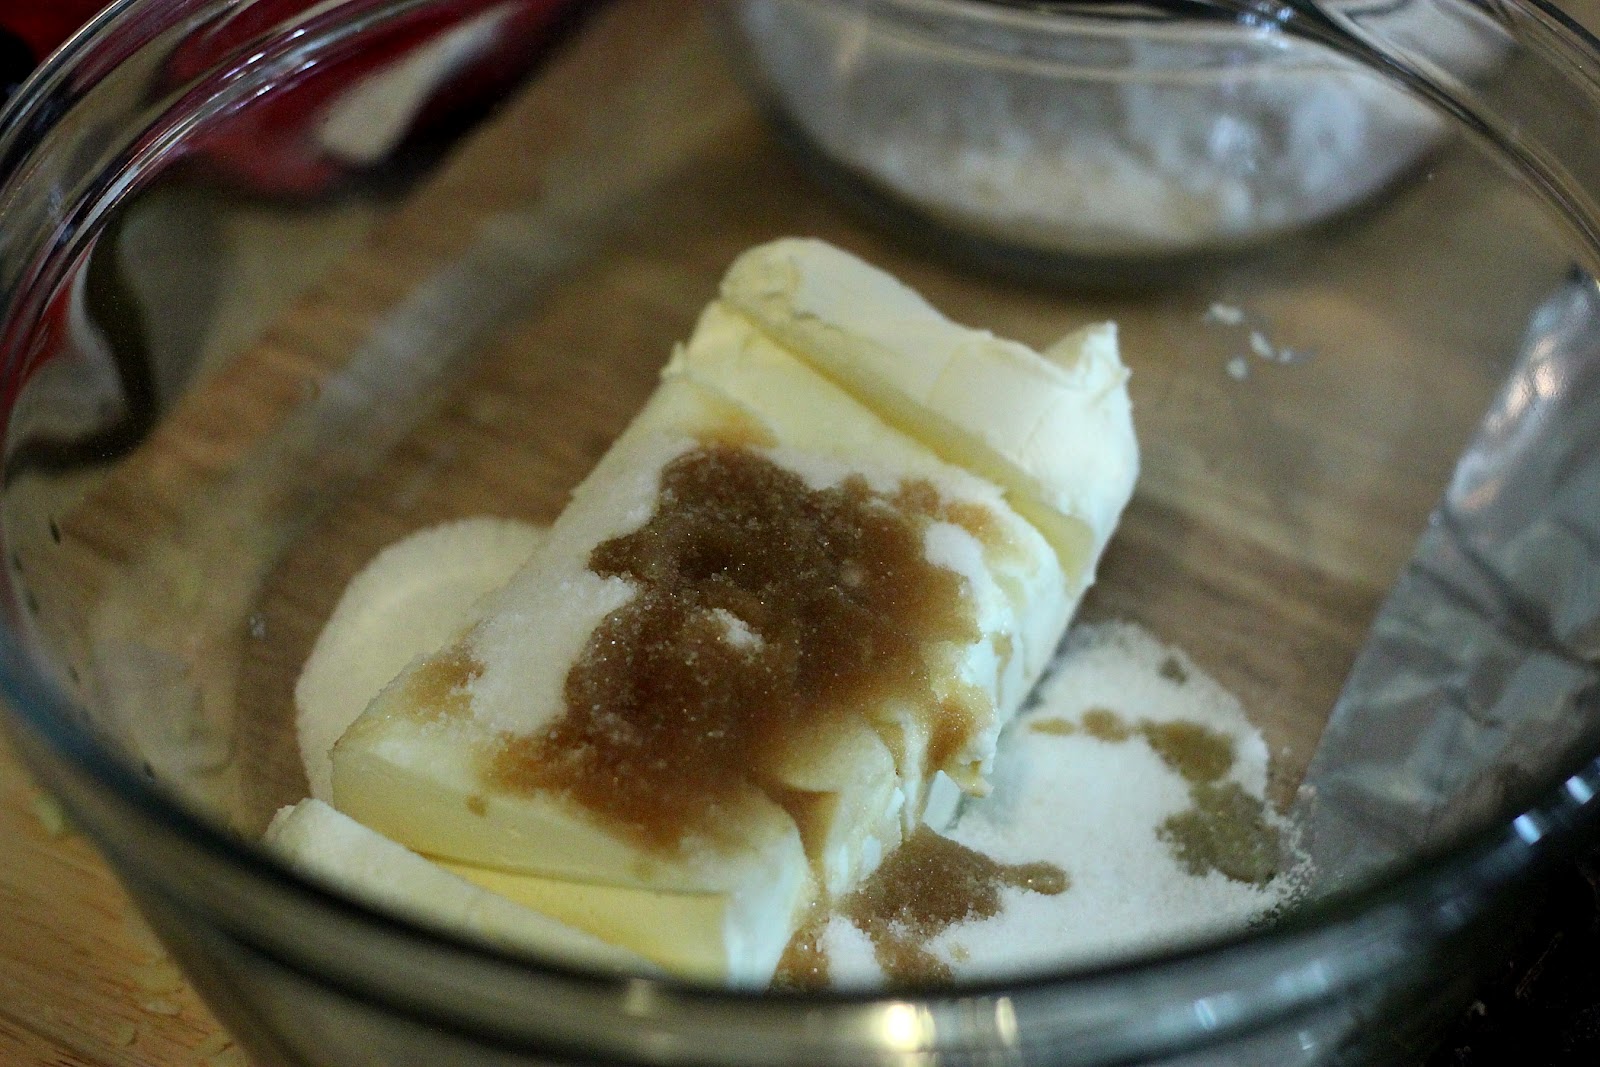
One key difference in these cookies is the addition of cornstarch.  I did some research, and apparently it's the cornstarch that gives the cookies their fluffy, chewy texture.  And that's all good in my book!


A nice big glass of milk makes
any baked good taste better

Dunk...

Delish


Fluffiest, Chewiest Chocolate Chip Cookies Ever.  Ever.  courtesy of Kelsey's Apple a Day
3/4 C butter, softened
3/4 C brown sugar
1/4 C white sugar
1 egg
2 tsp vanilla
2 C all purpose flour
2 tsp cornstarch
1 tsp baking soda
1/2 tsp salt
1 C bittersweet chocolate chips

Preheat oven to 350 degrees.  In bowl of a stand mixer fitted with paddle attachment cream butter and sugars together until light and fluffy (2-3 minutes usually).   Add egg and vanilla and blend.

Mix in flour, cornstarch, baking soda and salt.  Gently fold in chocolate chips.


Use a standard size cookie scoop to distribute dough onto prepared pan.  Bake 8-10 minutes, or just until the edges of the cookie begin to turn a light golden brown.

*DO NOT, I repeat, do not overbake!  You will think that they are not done yet, but they will set up very nicely once you let them rest after their baking session.  If you bake them for longer than 10 minutes for any reason they will not be chewy or soft.

Did I mention that you shouldn't bake them for longer than 10 minutes (or probably 8)?  Okay, good.

Scoops of love


*This is where I deviate from the original recipe.  Kelsey's says to use a standard sized cookie scoop to place small mounds of dough on a baking pan, but that didn't work out too well for me.  The cornstarch (while it keeps the cookies fluffy), also kept mine from spreading AT ALL.  So I was left with big, round heaped over cookies.

So I tried again thinking I had made the scoops too big.  Nope, same problem.  Frustrated, I patted these down with a spoon with 2 minutes to bake, but still to hardly any avail.

My last batch turned out just how I wanted.  Instead of scooping the dough, I formed "patties" just like you would with a hamburger.  I pulled together a ball of dough, flattened it to the exact thickness that I wanted in the cookie, and then smoothed around the edges.

I was also able to place my cookies fairly close together since they didn't spread.

My 3 batches from left to right...large and domed, squished down at the end,
and then just right.

Some reviewer's on Kelsey's site said that the scooping method worked great for them, and others even said that theirs fell flat.  But that wasn't the case with me, and the patty method was my answer to prayers.  I would suggest putting in a very small batch of maybe 2 cookies to see how yours turn out before selecting your method of prepping these wonderful guys.

mmmmm

Enjoy!

Wednesday, January 25, 2012

Whipped Banana Ice Cream

Surprise!  I'm back.  I know I said yesterday was my last post before my "wedding furlough", but I made some whipped banana "ice cream" yesterday and have been chomping at the bit to share it with all of you.  I have read about this recipe on Pinterest (don't even get me started on the addictive properties of Pinterest...oh dear lord!), and have been pondering trying it for some time now.


This recipe involves a banana.  Yep, that's it.  Just a banana.  Or two, or three, or even four depending on how much "ice cream" you want to make.  I put ice cream in quotation marks because it's not really ice cream.  But the frozen bananas are supposed to taste like ice cream.

You simply slice a banana, stick the pieces in a tupperware container in the freezer for an hour or two, and then whip the pieces in a blender.  Easy as pie.  Or well, in the case, as easy as ice cream.  I will say that I tried freezing the whole banana, but it doesn't work so great when you try to peel that whole frozen banana.  Peel it and chop it first, then freeze it.

Pinterest says you can just whip a banana, but I think next time I'd add a bit of peanut butter or chocolate to give it some depth of flavor.  Don't get me wrong, it's not that I didn't like it.  But I think it would taste better with some sugar :)  Leave it to me to ruin a healthy treat.

Tuesday, January 3, 2012

Vegan Chocolate Cake with (Non-Vegan) Strawberry Frosting

For my sister's 22 birthday (which was in October....I told you I was behind), she requested a vegan chocolate cake.  Yikes!  I must admit this request made me quite nervous from the get-go.  I have never made anything vegan and the few vegan dessert recipes I have tried left something to be desired.  But, since it was her birthday, I obliged.


The one thing that made me feel slightly better about this endeavor was that the recipe was for The Grit's Chocolate Vegan Death cake.  I've been to The Grit once before with my sister and must admit that their lemon poppyseed cake was phenomenal.  And not just phenomenal for a vegan cake, but just plain amazing.

We couldn't decide what flavor frosting to use and toyed around with the idea of chocolate, cream cheese, and raspberry.  Chocolate seemed to rich to pile onto a cake by the name of "Chocolate Death", so we opted for a strawberry frosting from the ever so wonderful Paula Deen.

I really enjoyed trying something different, because I feel like I often stick to my tried and true favorites (red velvet and italian cream), but I will have to admit that this cake was quite frustrating.  While the flavor of the cake exceeded my expectations, the crumb was so tender and the cake was so moist that the layers didn't want to stay intact.  Any time I transfered them they began to crumble.  And to top it off, the frosting, while also incredibly tasty, wouldn't ever thicken enough and therefore kept wanting to slide off the cake.  Thus, the whole thing had to be refrigerated to keep it together :(

Still, despite all of this I would recommend this cake recipe to be used for cupcakes.  That way you wouldn't have to worry about the cake being so tender.

To top off the cake I decided to try my hand at making some gum paste flowers.  While they weren't Food Network worthy, I was fairly pleased with my first try.  The moral of the story: don't be intimidated by trying new things!

Chocolate Vegan Death Cake
From the Grit
4 1/2 C all purpose flour
3 C sugar
1 C cocoa powder
1 Tbsp baking soda
2 Tsp salt
1 1/2 C vegetable oil
2 Tbsp pure vanilla extract
3 C strong brewed coffee
1/4 C cider vinegar

Preheat oven to 350 degrees.  Grease and flour 3 9-inch cake pans.

Sift together dry ingredients in large bowl.  Add oil and vanilla.  Blend together at a low speed until fully combined.  Switch mixer to medium speed and gradually add coffee.  When mixture is smooth, add cider vinegar and blend on low speed until just combined.

Divide batter evenly into prepared pans.  Bake 20-25 minutes or until toothpick inserted into the center of the layers comes out clean.

Remove to wire rack and let cool.

Strawberry Cream Cheese Frosting
From Paula Deen
1/4 C butter, softened
1 8-oz package cream cheese, softened
1 10-oz package frozen strawberries in syrup, thawed and pureed
1/2 tsp strawberry extract
7 C confectioners sugar

In medium bowl, beat butter and cream cheese until smooth.  Beat in 1/4 C strawberry puree (*please note that you do NOT use the whole package) and the strawberry extract.  Gradually add confectioners sugar and beat until smooth.

Gumpast Flowers


For the flowers I used Wilton's Gumpaste mix.  Love, love, LOVE this stuff.  It makes the whole process so easy.  Just follow the directions on the can and add your own coloring if desired.

To form the flowers I used two different size heart shape cookie cutters.  Roll out the gumpaste onto a surface floured with confectioners sugar and then use the cookie cutters to form the hearts.

Layer the hearts in an overlapping pattern to form the petals of the flowers.  Use a dab of water to adhere the hearts to each other.  Then gently place the flower into a muffin tin after cupping into a flower shape.  The muffin tin will hold the flower in place so that it will dry in such a shape.


**Please note that ideally you would use a Wilton flower forming mold.  I did not have any on hand and thus improvised with a muffin tin :)  I would certainly have achieved better results had I had the mold.

Monday, January 2, 2012

Well Owl Be....It's 2012!

Okay, a confession about my confections: if you haven't noticed I've taken a break from blogging that has lasted over a month and a half.  I got in this rut where, while I did indeed cook, I never got around to uploading the photos or posting on here about them.  Maybe it has something to do with the fact that I've been planning a wedding and have a lot of other stuff on my mind.  So sorry!

I figured for my first post back I should do something fun, and thus I'm bringing these adorable owl cupcakes to you.  My sister, Sarah Beth, is slightly obsessed with owls and I made these for her birthday.  I just love these little guys!  This is such an easy and fun project that is perfect for anyone ages 5-95.


All you need are some double stuffed Oreos, Reese's Pieces, Junior Mints and then your favorite cupcakes and chocolate frosting.  I cheated and used boxed Devils Food mix and canned icing.  It made the whole process slightly easier :)

After making the cupcakes and letting them cool, spread frosting over the cupcakes.  Make sure that the frosting on top is even, which will ensure that the "owl" part of this project is much easier.

Make the eyes first by twisting apart the Oreos.  *If you don't get double stuff the icing will be too thin and you won't be able to get a clean break.*  Then use a dab of frosting to adhere the Junior Mints to the frosted side of the Oreo halves.  Carefully press the Oreos onto the cupcakes.

To make the ears, cut in half the other portion of the oreo (the half without the vanilla frosting).  Press these two pieces above the eyes of the owl.  Then pipe chocolate frosting over them to make the feathers.

The last part is the beak.  Press a Reese's Piece in the middle of the cupcake below the eyes.

Tada!!  How cute are these guys?!  Definitely play around with the positioning of the Junior Mints to change up their expressions.


PS: I did *not* use double stuffed Oreos, and as you can see I had a hard time getting the frosting to stay completely on one side of the Oreos for the eyes......let's just say it was a point of frustration.

On another note...it's 2012!!  I can't hardly believe how fast this year has flown by.  For 2012 I have a few things on my bucket list to cook....

-Pound cake (can you believe I've never made one?  Ever?)
-Chicken and Dumplings
-Homemade Girl Scout cookies
-Creme Brulee
-Hi Hat Cupcakes
-Cake pops
-Chicken Enchiladas
-Tres Leche Cake
-Sweet Potato Biscuits
-14 Layer Cake

What's on your list for 2012?

Friday, February 18, 2011

Dreamy Apple Pie

I had a hard time deciding what recipes to begin posting so I thought I would start with a few things I have cooked in the past.  For those of you who have seen these first few recipes on my facebook:  no worries, there will be new foods posted very soon.

I'd always wanted to bake an apple pie.  It's such a classic staple and it fits seamlessly into all 4 seasons.  I'm quite obsessed with The Pioneer Woman and her delicious recipes, so I thought that one of her apple pie recipes would be the best place to start.  This is not your typical apple pie though....it's creamier and has a brown sugar crumb topping instead of your classic pie crust.  I fixed this pie for Thanksgiving this past year and it was a hit.  I'm not a big fan of apple pie (I know, you're thinking: "Then why the heck would you even make one?"), but I loved this recipe!  


Dreamy Apple Pie courtesy of The Pioneer Woman
1 whole unbaked pie crust (recipe below)
3 whole large (4 or 5 small) Granny Smith Apples, peeled, cored and sliced thin
1/2 C brown sugar
1/2 C sugar
1 Tbsp all purpose flour
1 C heavy cream
2 tsp vanilla extract
1/8 tsp cinnamon

7 Tbsp butter
3/4 C all purpose flour
1/2 C brown sugar
1/4 C pecans (more to taste)
dash of salt


Preheat oven to 375 degrees.
Roll out pie dough and place it in a pie pan. Decorate edges as desired (I like to crinkle mine).

Add apple slices to large bowl. In separate bowl, mix together cream, 1/2 cup brown sugar, 1/2 cup sugar, 1 tablespoon flour, vanilla, and cinnamon. Pour over apples and stir to coat. Pour apple mixture into pie shell.


Ready for the crumb coat topping!
In bowl of a food processor (or you can cut everything together by hand using a pastry cutter) combine butter, flour, sugar, pecans (chop if you’re not using a food processor), and salt. Mix until everything comes together and resembles a coarse cornmeal. Disperse topping over apple mixture in pie crust.

Attach foil to edges of pie and lay a piece of flat foil loosely over the top of pie. Place pie pan on top of a rimmed cookie sheet (to catch any overflow) and bake for one hour. Near the end of the baking period, remove foil and allow to finish baking.  This will allow the pie to brown. Can bake for up to 15 or 20 minutes more if necessary.
Remove from oven when pie is bubbly and golden brown.
Serve warm..... preferably with ice cream!


Perfect Pie Crust courtesy of The Pioneer Woman
1 1/2 C crisco
3 C all purpose flour
1 whole egg
5 Tbsp ice cold water
1 Tbsp white vinegar
1 tsp salt

The team all ready to go!

In large bowl, use pastry cutter to cut crisco into flour.  This will take a little under 5 minutes and the mixture choose resemble coarse meal.  In separate small bowl, beat egg.  Pour into flour mixture.  Add cold water, vinegar and salt.  Stir until gently combined.

Separate dough into three even groups.  Form separate dough into three balls.  Place each ball of dough into zip loc bag and flatten with rolling pin to about 1/2 inch thickness.  


Dough can be frozen until you need it.  If you want to make your pie right away I would still suggest letting your dough chill in the freezer for at least 20 minutes so that it is firmer and easier to work with.

To prepare the dough for a pie, remove from freezer and allow to sit at room temp for 15 minutes.  Roll dough out onto floured work surface.  *Its much easier if you start in the middle and then work your way out.

Roll dough out until it's approximately 1 inch larger than the diameter of your pie pan.  If the dough is too sticky, add a bit of extra flour on top of the dough.  

Carefully lift your dough into pie pan.  I use a spatular to make it easier.  You can also drape it over your rolling pin if that's easier.  

Press dough into pie pan, eliminating any bubbles.  Style edges of dough as desired.