Saturday, February 26, 2011

Marshmallow Fondant

Ok, I know what you're thinking:  "Why in the world would I want to use fondant on a cake when I can use buttercream?  Buttercream is SO much easier to make and it tastes better."  Well yes, buttercream is easier and it does taste better.  But you can't make a bow out of buttercream.  The same thing goes for pretty much any other 3D art you want to add to your cake or cupcakes.

I've heard horror stories about fondant and how it tastes like cardboard, so I thought it might be best to try to make my own instead of using the canned stuff.  It takes a lot of time but I think it's worth it in the end if you plan on eating (or simply tasting!) any of your decorations.

There are many types of fondant but I think marshmallow fondant is the best tasting.  Fondant is definitely something that is easier to work with as you practice more and more.  This was my first time making or using fondant so I'll try to feature it again when my work will be more aesthetically pleasing :)

I don't have any pictures of me actually making the fondant, but have instead included pictures of how I made the bow and pictures of the final product.

Marshmallow Fondant
Source: Allrecipes


  • 1/4 cup butter
  • 1 (16 ounce) package miniature marshmallows
  • 4 tablespoons water
  • 1 teaspoon vanilla extract
  • 2 pounds confectioners' sugar, divided

Place butter in shallow bowl and set aside.  Place the marshmallows in a large microwave-safe bowl and microwave on high for 30 seconds to 1 minute to begin melting marshmallows.  Carefully stir water and vanilla extract into hot marshmallows.  Stir until mixture is smooth.  Slowly beat in confectioners sugar, one cup at a time, until the dough is sticky.  Reserve 1 cup confectioners sugar for kneading.  The dough should be very stiff.

Rub hands thoroughly with butter (or you can spray them with Pam).  Begin kneading the dough until it becomes more pliable.  Turn dough onto a working surface dusted with confectioners sugar and continue kneading until fondant is smooth (5-10 minutes).

Form fondant into ball, wrap tightly in plastic and refrigerate overnight.  To use, allow fondant to come to room temperature and roll out on flat surface dusted with confectioners sugar.


Fondant Bow

The bow can be a bit intimidating at first, but it's not anywhere near as hard as it looks.  I don't have too many detailed pictures of this process, so I'm going to recommend using this site if you are looking for a step by step tutorial.  This tutorial will walk you through the entire process and has tons of pictures to reference.  

You basically cut the fondant into even strips of the same length to form individual loops.  Make sure you use just enough water to seal the loops, but not enough to make the fondant slippery and soggy.  Then you let the loops dry overnight (leave them uncovered).  They will stiffen up by the next day.

Loops laid out to dry overnight

To assemble the bow, alternate the direction of the loops in a bottom circle.  Then continue this same pattern until you have formed the full bow.  Use melted candy melts to hold the bow together.  I like to use these because they come in a variety of colors.  Again, I don't have step by step pictures, so make sure to check out that tutorial I linked to earlier.

The bow in all its glory

To apply fondant covering to the cake, first cover the cake with a thin layer of regular frosting (buttercream, cream cheese frosting, etc).  This will help the fondant adhere to the cake and will also keep your cake tasting delicious!

I cheated and used canned frosting for this step to save time...don't tell!

Roll fondant into a thin layer (not too thin or it will tear).  The hardest part for me was getting the fondant from the work surface to the cake.  It kept tearing and I kept getting frustrated.  For me, rolling the fondant around a rolling pin and then carrying it over to the cake seemed to do the trick.  Once you've laid the fondant onto the cake, use a smoothing tool (you can get one here) to smooth the fondant to the sides of the cake.  Then cut the excess from around the base of the cake.  A pizza cutter will work just fine.  My cake didn't get as smooth as I would like, but it wasn't too terrible for my first time.  I also knew I could cover the bottom with some decorations.


You're almost done!  Then simply use melted candy discs to adhere all of your decorations.


Then take the bow back off to eat :)

I used pearl dust to cover all of my decorations, but they would be just fine as is.  I was also very surprised by just how yummy the fondant was...nothing at all like what I was expecting.  It had that smooth look, but was soft when you bit into it.  I'll definitely be trying my hand at it again when I have time.

How about you?  Do you prefer fondant or buttercream?  And have you ever tried working with fondant?

Tuesday, February 22, 2011

White Chocolate Macadamia Nut Bars

I think my love affair with white chocolate and macadamia nuts began with those infamous Subway cookies.  You know, the ones that were never completely baked and were alway just gooey enough.  I've tried my hand at several copycat cookie recipes in the past and they never quite measure up.

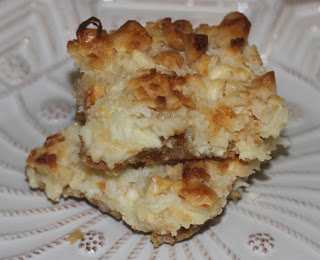
Until, that is, I came across several variations of this White Chocolate Macadamia Nut Bar online.  The below recipe can be adjusted to suit your tastes (I added more white chocolate but less coconut), and it's pretty hard to mess up.  If you ever need to throw something together at the last minute, this is your recipe!

White Chocolate Macadamia Nut Bars
1 cup graham cracker crumbs
1/2 cup quick oats
1/2 cup (or 1 stick) butter, melted
1 2/3 white chocolate chips
1 cup roasted salted macadamia nuts, roughly chopped
3/4 cup shredded coconut
1 14-oz can sweetened condensed milk

The Cast


Preheat over to 350 degrees and grease 8x8 inch pan.
In medium bowl, combine butter, graham cracker crumbs and oats. (*Tip: Instead of buying graham cracker crumbs, simply place several graham crackers in a ziplock bag and roll over it with a rolling pin several times to crush)


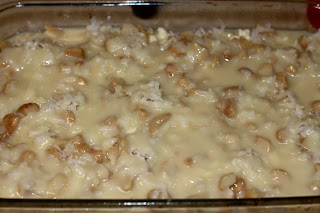
Use fingers or the back of a spoon to press graham cracker mixture evenly into the bottom of the pan.  Top with white chocolate chips, macadamia nuts and coconut.  Pour sweetened condensed milk over the mixture.  Yes, it's that easy!


Bake 25 minutes or until coconut begins to toast.  Make sure you don't place the pan too high, or else the coconut will brown too quickly.  Let cool and then cut into squares. (*If you cut the squares too soon they will be too gooey to remove from the pan).  Enjoy!

Saturday, February 19, 2011

Welcome to the New Blog!

Hi there!  I had previously shared all of my adventures in the kitchen on Facebook.  However, the album is becoming quite large and I figured that maybe a blog would be a better place to post.  I've also had a few requests for recipes and this blog will allow me to share those as well.

I definitely do not have any formal training and get the vast majority of my recipes from other great cooking and baking blogs.  As time goes by I'll be spicing up the site in general with more features....it just might take a while to get the hang of things.

Feel free to post questions and/or comments!

Friday, February 18, 2011

Dreamy Apple Pie

I had a hard time deciding what recipes to begin posting so I thought I would start with a few things I have cooked in the past.  For those of you who have seen these first few recipes on my facebook:  no worries, there will be new foods posted very soon.

I'd always wanted to bake an apple pie.  It's such a classic staple and it fits seamlessly into all 4 seasons.  I'm quite obsessed with The Pioneer Woman and her delicious recipes, so I thought that one of her apple pie recipes would be the best place to start.  This is not your typical apple pie though....it's creamier and has a brown sugar crumb topping instead of your classic pie crust.  I fixed this pie for Thanksgiving this past year and it was a hit.  I'm not a big fan of apple pie (I know, you're thinking: "Then why the heck would you even make one?"), but I loved this recipe!  


Dreamy Apple Pie courtesy of The Pioneer Woman
1 whole unbaked pie crust (recipe below)
3 whole large (4 or 5 small) Granny Smith Apples, peeled, cored and sliced thin
1/2 C brown sugar
1/2 C sugar
1 Tbsp all purpose flour
1 C heavy cream
2 tsp vanilla extract
1/8 tsp cinnamon

7 Tbsp butter
3/4 C all purpose flour
1/2 C brown sugar
1/4 C pecans (more to taste)
dash of salt


Preheat oven to 375 degrees.
Roll out pie dough and place it in a pie pan. Decorate edges as desired (I like to crinkle mine).

Add apple slices to large bowl. In separate bowl, mix together cream, 1/2 cup brown sugar, 1/2 cup sugar, 1 tablespoon flour, vanilla, and cinnamon. Pour over apples and stir to coat. Pour apple mixture into pie shell.


Ready for the crumb coat topping!
In bowl of a food processor (or you can cut everything together by hand using a pastry cutter) combine butter, flour, sugar, pecans (chop if you’re not using a food processor), and salt. Mix until everything comes together and resembles a coarse cornmeal. Disperse topping over apple mixture in pie crust.

Attach foil to edges of pie and lay a piece of flat foil loosely over the top of pie. Place pie pan on top of a rimmed cookie sheet (to catch any overflow) and bake for one hour. Near the end of the baking period, remove foil and allow to finish baking.  This will allow the pie to brown. Can bake for up to 15 or 20 minutes more if necessary.
Remove from oven when pie is bubbly and golden brown.
Serve warm..... preferably with ice cream!


Perfect Pie Crust courtesy of The Pioneer Woman
1 1/2 C crisco
3 C all purpose flour
1 whole egg
5 Tbsp ice cold water
1 Tbsp white vinegar
1 tsp salt

The team all ready to go!

In large bowl, use pastry cutter to cut crisco into flour.  This will take a little under 5 minutes and the mixture choose resemble coarse meal.  In separate small bowl, beat egg.  Pour into flour mixture.  Add cold water, vinegar and salt.  Stir until gently combined.

Separate dough into three even groups.  Form separate dough into three balls.  Place each ball of dough into zip loc bag and flatten with rolling pin to about 1/2 inch thickness.  


Dough can be frozen until you need it.  If you want to make your pie right away I would still suggest letting your dough chill in the freezer for at least 20 minutes so that it is firmer and easier to work with.

To prepare the dough for a pie, remove from freezer and allow to sit at room temp for 15 minutes.  Roll dough out onto floured work surface.  *Its much easier if you start in the middle and then work your way out.

Roll dough out until it's approximately 1 inch larger than the diameter of your pie pan.  If the dough is too sticky, add a bit of extra flour on top of the dough.  

Carefully lift your dough into pie pan.  I use a spatular to make it easier.  You can also drape it over your rolling pin if that's easier.  

Press dough into pie pan, eliminating any bubbles.  Style edges of dough as desired.